By Jonmichael Hands, NVMe MWG Co-Chair, Sr. Strategic Planner / Product Manager, Intel
NVM Express™ (NVMe™) technology has enabled a robust set of industry-standard software, drivers, and management tools that have been developed for storage. The tool to manage NVMe SSDs in Linux is called NVMe Command Line Interface (NVMe-CLI).
Data centers require many management functions to monitor the health of the SSD, monitor endurance, update firmware, securely erase storage and read various logs. NVMe-CLI is an open source, powerful feature set that follows the NVMe specification and is supported by all major distributions. It supports NVMe SSDs as well as NVMe™ over Fabrics (NVMe-oF™) architecture and offers optional vendor plugins for supplemental information above and beyond the specification. You can learn about why SSDs fail and why NVMe technology monitoring, management, error reporting, and logging are so important in my recent blog post.
The man page or -help is not enough for understanding the capabilities of NVMe-CLI, but the good news is all the commands are written directly to match the spec! All you need to do is download a copy of the latest NVMe 1.4 specification to be able to interpret the abbreviations for the various commands. The man page should be referenced though for command structure within NVMe-CLI, which will hopefully be being continually updated and can be found here.
For instance, in section 5.15.3 Identify Controller data structure, you can send the command nvme-id-ctrl in NVMe-CLI. The output will have abbreviations for the various fields, for instance, Model Number (MN) is displayed in NVMe-CLI as mn: You will see a lot of examples in this overview of the nvme-cli command and the table in the spec that details the options on a command.
NVMe-CLI can be obtained as a package for all the Linux distributions.
In Ubuntu:
CentOS/RHEL 7.x or 8.x:
Here is the cheat sheet of the most commonly used commands. Remember NVMe-CLI is powerful and can do almost anything that the NVMe specification calls out if used correctly. We will go into all these commands in detail.
| Command | Description |
| nvme list | Lists all the NVMe SSDs attached: name, serial number, size, LBA format, and serial |
| nvme id-ctrl | Discover information about NVMe controller and features it supports |
| nvme id-ns | Discover feature of NVMe namespaces, optimizations, features, and support |
| nvme format | Secure erase the data on an SSD, format an LBA size or protection information for end-to-end data protection |
| nvme sanitize | Securely erases all user data on the SSD |
| nvme smart-log | Outputs the NVMe SMART log page for health status, temp, endurance, and more |
| nvme fw-log | Outputs the firmware log page |
| nvme error-log | Outputs the NVMe error log page |
| nvme reset | Resets the NVMe controller / NVMe SSD |
| nvme help | e.g nvme intel help will display optional commands for Intel drives, this is the vendor plugins for nvme-cli |
| nvme delete-ns | Delete a namespace |
| nvme create-ns | Create a new namespace, e.g creating a smaller size namespace to overprovision an SSD for improved endurance, performance, and latency |
| nvme fw-download | Download a new firmware to the NVMe device |
| nvme fw-commit | Commit (activate) the firmware to run immediately or after the next reset |
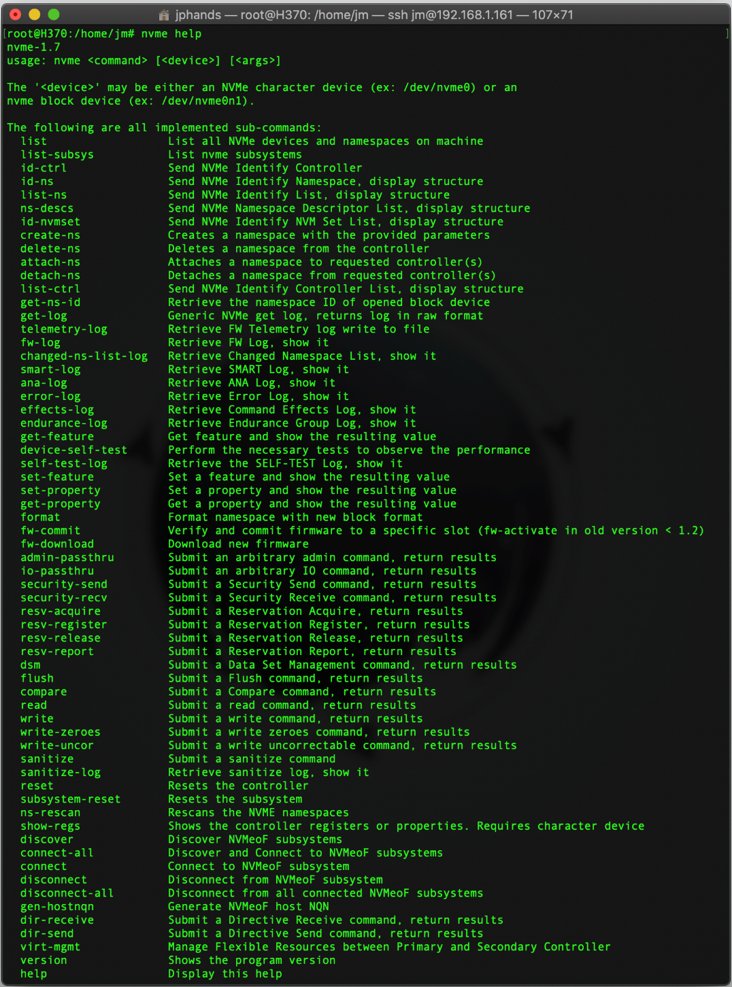
You can see the help for the entire list of commands…so much power!

Learning About the Capabilities of Attached NVMe Controllers / SSDs
The identify controller command is used to learn about the capabilities of the NVMe controllers (in most cases, this is the capabilities of an NVMe SSD). Instead of guessing which features a vendor supports, they are all neatly laid out in the capabilities field. Other useful information includes drive model, vendor, firmware version, etc., that all have abbreviations called out in the NVMe spec.
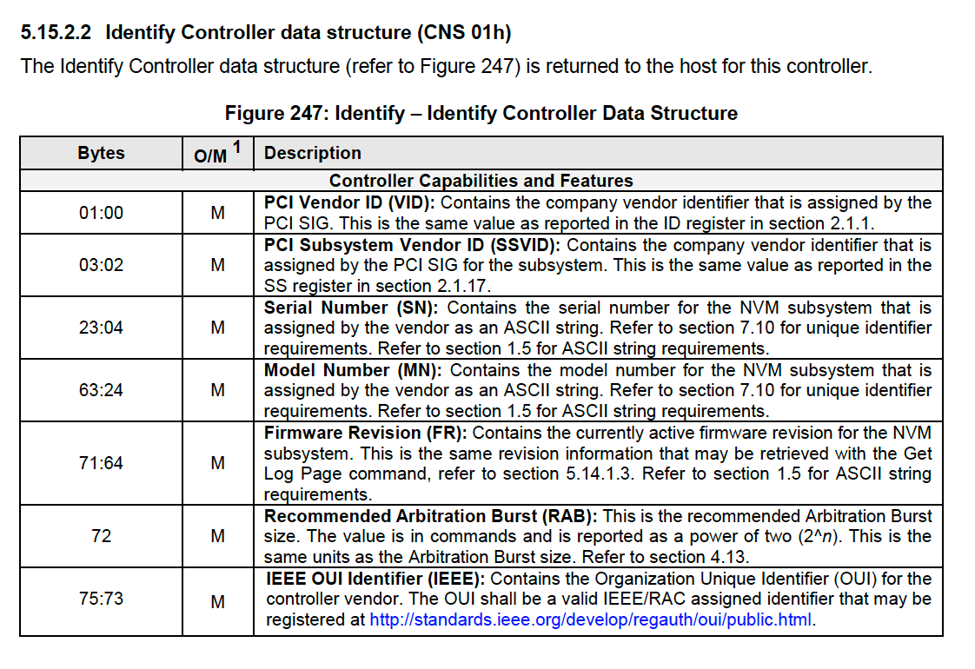
Here are the first few Bytes of the Identify Controller data structure, which the identify controller command reads out

Use the list to find attached NVMe SSDs
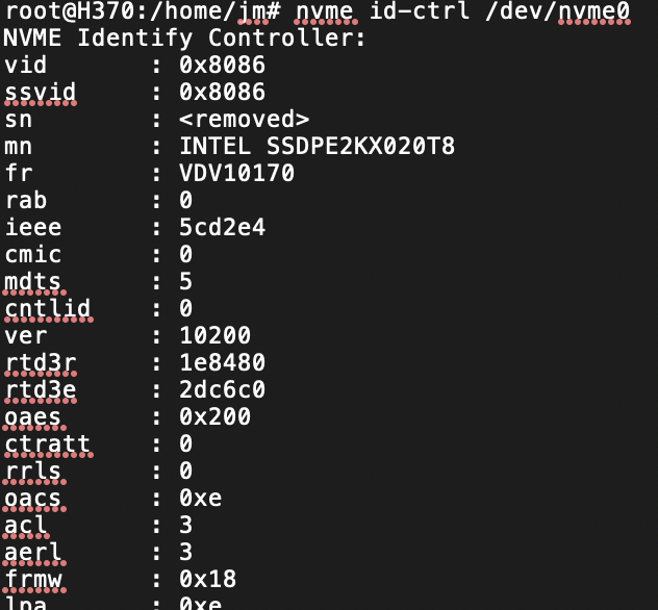
Identify Controller command

You can see the first few lines in the output match identically to the identify data structure in the spec: vid = PCIe Vendor ID, sn = Serial Number, fr = Firmware Revision, and so on.
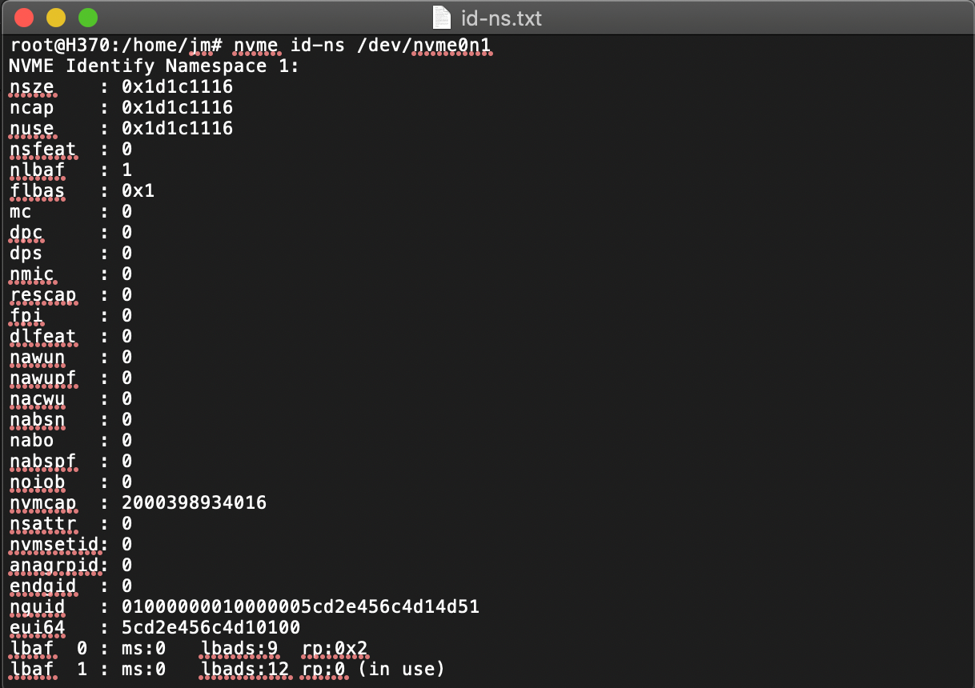
Identify Namespace
Namespaces are the construct in NVMe technology that hold user data. An NVMe controller can have multiple namespaces attached to it. Most NVMe SSDs today just use a single namespace, but multi-tenant applications, virtualization and security have use cases for multiple namespaces.

You can find out the size of the namespace and the namespace utilization (NUSE) is useful for generating reports on the percentage of LBAs that are being used. There is a lot of useful data in the identify namespace command that can be used by host software to optimize performance, data integrity, TRIM (deallocate), LBA size (e.g. 512B, 4kB) and more. Read the NVMe 1.4 spec for Namespaces and Identify Namespaces for all the detailed capabilities.

SMART Log
The most commonly used command in the NVMe-CLI is likely the smart-log command, which is used to monitor health, temperature, status, etc. through NVMe SMART.
example output of an Intel® SSD DC P4510 that has gone through quite a bit of validation / testing.

Error Log Page

Look for output where error count does not equal 1 to find out if there are any errors in the error log.
Update device firmware
SSD vendors will typically release new firmware over the production period of the SSD. It is not uncommon to see four to five updates during a five year deployment of an SSD. Firmware updates ensure the most up to date security patches, bug fixes, and reliability improvements. An OEM generally handles firmware updates with their management tools and cryptographically signed firmware images that match the OEM, but NVMe SSDs obtained with generic firmware from a channel partner or distributor can be updated. Ask your SSD vendor for the latest firmware version.
Instead of describing the process here, please visit section 8.1 of the NVMe 1.4 spec Firmware Update Process. This will go over in detail where resets are needed, the concept of firmware slots – some NVMe SSDs can have multiple copies of firmware on the device and you can activate a specific copy to run. Generally speaking, most SSDs have redundant copies of the same image for security purposes.
Find current fw revision
Download firmware ( n ) to target drive
Here is what the different commit actions do (-a), as you can see they nicely match the spec table.
0: Downloaded image replaces the image indicated by the Firmware Slot field. This image is not activated.
1: Downloaded image replaces the image indicated by the Firmware Slot field. This image is activated at the next reset.
2: The image indicated by the Firmware Slot field is activated at the next reset.
3: The image specified by the Firmware Slot field is requested to be activated immediately without reset

The input -s can be used for a specific slot.
After the firmware download, you may need a reset of the drive, if the device does not support firmware activation without reset
Secure Erase: Format, and Sanitize
These commands are used to securely erase user data from the device. This can be used when deploying a new device, retiring or at device end-of-life, using an SSD for a new application and so on. There are a few variations we will cover. Sanitize was introduced in NVMe 1.3 specification, so before then NVMe Format was used exclusively to perform secure erase. While both options work, Sanitize is more robust for ensuring the data was properly wiped; format is good for everyday use and testing.
Format
0: No Secure Erase operation requested (generally speaking, this just TRIMs/deallocates all the LBAs)
1: User Data Erase – this physically erases the data on the drive. In a mainstream NAND NVMe SSD, this will trigger the erase of all the blocks as well as changing the cryptographic key. Due to the physics of NAND erases (consuming power and time) this can take some time (for large drives measured in single digit minutes)
2: Crypto Erase, this completes much faster (under 1 second in most cases) by swapping out the cryptographic key so that all data is rendered unreadable. Like all three cases, this will deallocate the LBAs and some drives may support deterministic read zero after TRIM for subsequent reads.
Remember when we learned about identify controller (id-ctrl)? This will come in handy seeing what type of secure erase the NVMe SSD supports. Check the Optional Admin Command Support (OACS) Bit 1 for if format NVM is supported or not
Format the NVMe SSD with a crypto erase to namespace 1
Changing LBA Format – this is set via the NVMe-format command, but you can use identify namespace to check the LBA formats and sizes that the drive supports, and find out which is recommended by the SSD firmware
Check Formatted LBA Size (FLBAS)
Sanitize
Please check section 8.15 in NVMe 1.4 specification for an overview of Sanitize Operations (Optional).
According to the NVMe 1.4 specification, “a sanitize operation alters all user data in the NVM subsystem such that recovery of any previous user data from any cache, the non-volatile media, or any Controller Memory Buffer is not possible.”
The big difference between Sanitize and Format is that sanitize ensures caches are deleted, and the process starts again after an unexpected power loss. Sanitize also supports a pattern overwrite for a secure erase operation, which is terrible for NAND endurance but can be used with other types of storage and memory classes, or for more certainty that user data cannot be recovered.
All the features of the Sanitize Command can be found in the NVMe 1.4 Specification

Check the Sanitize Capabilities (SANICAP) in Identify Controller. Since this is an NVMe 1.3 specification feature, older drives might not support it yet.
Great! This drive supports block and crypto sanitize. I’m going to run a block erase.
After each supported operation read the Sanitize Command Dword 10 information (SCDW10).
NVMe Reset
Reset NVMe controller (soft reset of the device, a hard reset requires a full power cycle, hot plug, or system reboot). We saw the case of the firmware update where this command came in handy, but this can also be used.
NVMe-CLI is a very powerful tool for managing NVMe SSDs directly in Linux. All the information needed to understand the features and functionality is contained in the NVMe specs – do not feel scared to download a copy and open! I’ve highlighted the most common commands for managing NVMe SSDs but the tool also works for NVMe-oF architecture, which will be covered separately. NVMe technology has a robust set of management, logging, error reporting capabilities and NVMe-CLI is the way to unlock the value in Linux. NVMe-CLI is also a great way to start learning about the capabilities of NVMe in a hands on way – so download it and try it out for yourself!
